Initiate Billing
A visit is automatically created when an appointment is added for a patient. For walk-in patients, create a visit manually.
Before you begin
About this task
You can process billing and finalise an invoice before or after a consult, or for a previous visit where tha consult was not paid.
Finalisation of an invoice generally occurs at the end of a consult. However, if you want to finalise before the consult, in the Visit, click Process Billing.
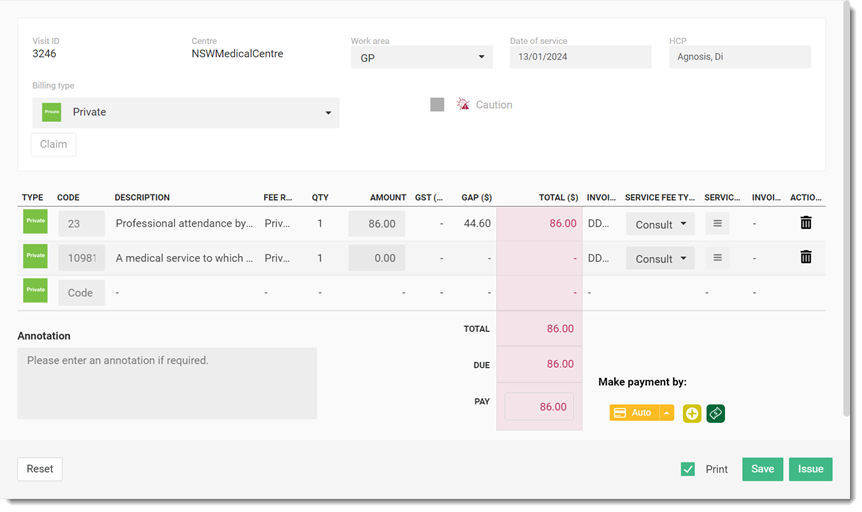
For services delivered on the same day, after a consult is concluded and a visit has
been recorded, a list of the visit Service Items is added to the patient's timeline,
flagged with the ![]() Visit items and to the Billing page.
Visit items and to the Billing page.
Procedure
-
Initiate a billing process either:
- If you have created a visit without adding to the Patient
Queue, in the
 Visit panel, click Process
Billing.
Visit panel, click Process
Billing. - Otherwise, in the Patient Queue window:
- Select a patient you want to initiate a billing.
- In the floating navigation bar, click Visit.
- In the Visit panel, click
Process Billing.
- If you have created a visit without adding to the Patient
Queue, in the
-
In the Billing page, from the Billing
type list, select a billing type.
Depending on the billing type selected, different options are displayed. For more information, see Billing Types. -
If the service seems unusual, a warning message may be displayed. From the
Service text list, select a justification. For
example, if a patient has already had an appointment today and is being billed
for another appointment, select a service message to explain the second
consultation, such as Not Duplicate Service. In the Service text
column, click
 Menu, and select an option or enter text in the
Service text field and click
OK. This displays as a note on
the invoice.
Menu, and select an option or enter text in the
Service text field and click
OK. This displays as a note on
the invoice.
-
If required, set Print.
To include an HCP's bank details in their invoices, provide an HCP's bank account details in
 user >
  Settings > Users > Account List >
  Search >
  Edit > Bank account details section. For more information about each fields, see Bank
account details.
Edit > Bank account details section. For more information about each fields, see Bank
account details.
Results
A printed invoice is generated in a Print Preview window with an HCP's banking details if recorded.
What to do next
At the end of the consult, finalise the account.