Reverse Invoice
If the visit type or service date was incorrectly recorded, reverse the patient's invoice.
Before you begin
Warning:
- To reverse an invoice, you must first zero the value of the invoice amount. For more information about adjusting an invoice amount, see Adjust - Item or Amount.
- You cannot undo a Did Not Wait or reverse invoice action.
- The Did Not Wait process can only be performed once per invoice. You should reverse the whole invoice not just one line item.
About this task
Procedure
To reverse an invoice:
-
From the
 Patient Search or
  Patient Queue, select a patient.
-
To view a patient's transaction history,
click
 Transaction History in the floating navigation bar. You are
redirected to the Transaction History
panel.
Transaction History in the floating navigation bar. You are
redirected to the Transaction History
panel.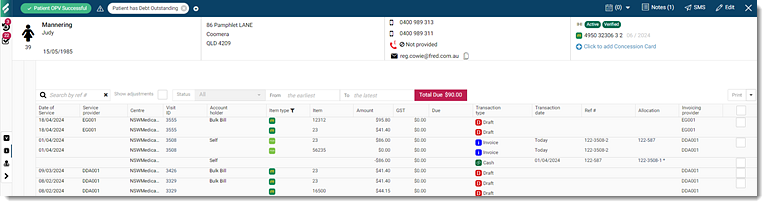
Tip:To minimise the number of transactions on the screen, apply filters such as a date range, visit type, reference number, paid or unpaid. -
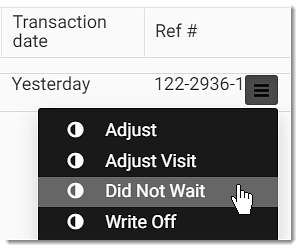
Hover your mouse over the invoice item and click
 Menu.
Menu.
-
From the list, select Did Not Wait.
-
A Confirm Did Not Wait confirmation prompt is displayed.
To complete a reverse invoice, enter your credential details:
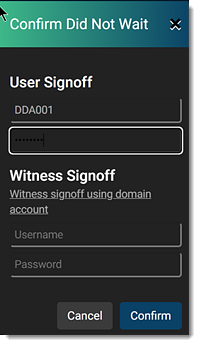
- In the User Signoff section, enter your username and password.
- In the Witness Signoff section, enter the witness user's username and password and use a domain account.
Results
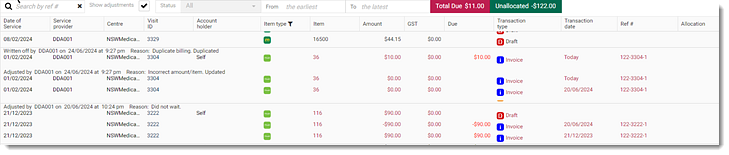
To view the details of the reverse invoice, in the Transaction
History, set Show adjustments to display user
details, date, time, reason and comments.
What to do next
To print the required invoices or adjustment details, from the Print list, select either Print or Print with adjustment. For more information, see Print Invoices.